Apache Airflow Installation Steps for MacOS
This post outlines the steps needed to setup a local instance of Apache Airflow on your Mac. I have performed this installation on MacOS Big Sur.
Installation and Environment Setup
First launch a terminal window and go to the directory where you want to setup Airflow. On my system I have created a folder ‘airflow’.(base) ... % mkdir airflow
(base) ... % cd airflow
(base) ... airflow % pwd
/.../airflow
where ‘. . .’ could be any path as per your system.
Set the environment variable AIRFLOW_HOME with the path of the ‘airflow’ directory.(base) ... airflow % export AIRFLOW_HOME=/Users/.../airflow
Setup and activate a separate virtual environment. I am using the same name ‘airflow’ for the environment.(base) ... airflow % conda create --name airflow python=3.8.5(base) ... airflow % conda activate airflow
Now setup Airflow using pip install. At the time of writing this blog, the latest available stable version is 2.1.2 so I will be setting up that version as shown below.(airflow) ... airflow % pip install 'apache-airflow[gcp,statsd,sentry]==2.1.2'
We have also installed some extra packages. ‘gcp’ for interacting with GCP resources, ‘statsdb’ for monitoring and ‘sentry’ for error tracking.
You can now check the installed version of Airflow.(airflow) ... airflow % airflow version
2.1.2
Database Setup
Now initialise the database. We will continue with the default SQLite database which is good enough for becoming familiar with Airflow.
Note, you won’t be able to use other executors on SQLite which you would want if you are setting up your production environment.(airflow) ... airflow % airflow db init
DB: sqlite:////Users/.../airflow/airflow.db
[2021-08-05 15:36:57,159] {db.py:692} INFO - Creating tables
INFO [alembic.runtime.migration] Context impl SQLiteImpl.
...
...
...
Initialization done
You can also check the status of database connection.(airflow) ... airflow % airflow db check
[2021-08-05 18:01:31,725] {cli_action_loggers.py:105} WARNING - Failed to log action with (sqlite3.OperationalError) no such table: log
[SQL: INSERT INTO log (dttm, dag_id, task_id, event, execution_date, owner, extra) VALUES (?, ?, ?, ?, ?, ?, ?)]
...
...
[2021-08-05 18:01:31,725] {db.py:773} INFO - Connection successful.
User Setup
Now create a user with which you can login to the Airflow console. We will first create a admin user.(airflow) ... airflow % airflow users create --role Admin --username admin --email admin --firstname admin --lastname admin --password admin
...
Admin user admin created
You can now check that the user has been created successfully.(airflow) ... airflow % airflow users list
id | username | email | first_name | last_name | roles
===+==========+=======+============+===========+======
1 | admin | admin | admin | admin | Admin
Server Startup
Start the Airflow webserver. I will be running the server on port 9090.(airflow) ... airflow % airflow webserver -p 9090
On launching the page and entering the credentials of the admin user you have just created, you will see a similar screen.
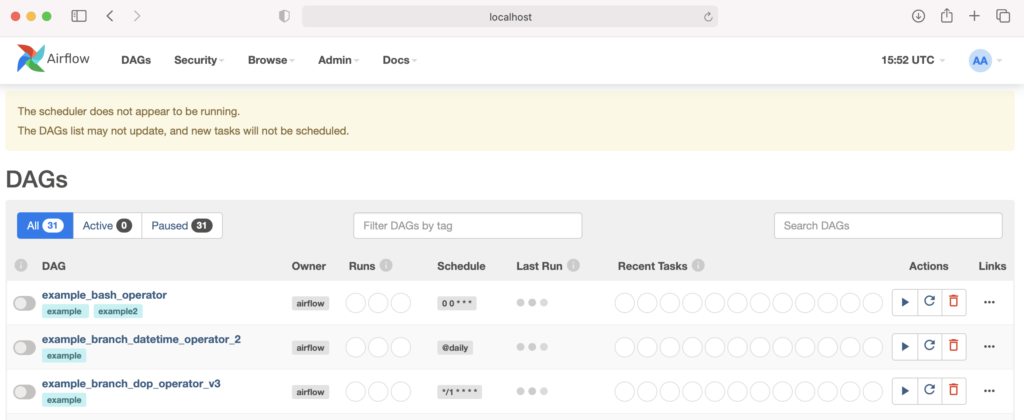
Scheduler
As you can see, there is a warning message displayed that the scheduler is not running. To start the scheduler, open another terminal window, go to the Airflow working directory and export the AIRFLOW_HOME with the working directory path.(base) ... airflow % export AIRFLOW_HOME=.
(base) ... airflow % conda activate airflow
Now activate the virtual environment and start the scheduler.(base) ... airflow % conda activate airflow
(airflow) ... airflow % airflow scheduler
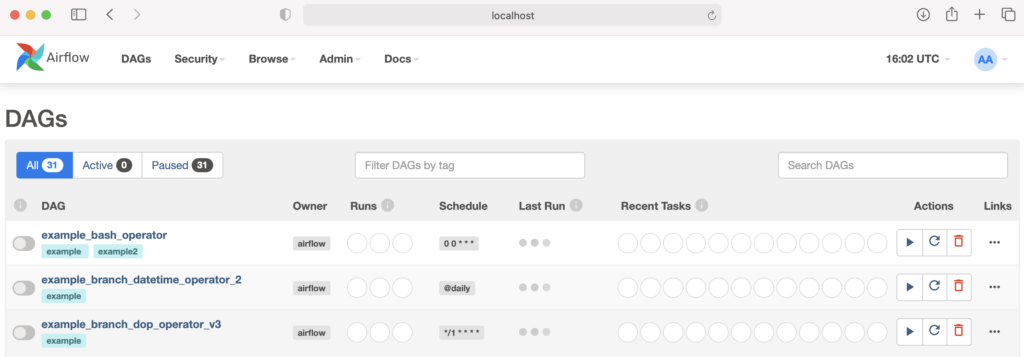
Now go back to the Airflow console and refresh the page. The warning message should disappear now.
Your Apache Airflow local installation is complete. You have been provided with some pre-defined DAGs so you can start exploring it now.